
Thursday, October 13, 2011


Tuesday, September 27, 2011
A RE(al) TREAT
This past weekend I had the wonderful privilege of attending the Ladies Fall Retreat for the Franklin Rd. Baptist Church, Murfreesboro, Tn. What a wonderful time I had! My daughter, Hannah, got to go with me. Anytime we go on a trip together it's an adventure; usually off the beaten trail! This time was no different, even though we were using two navigation devices! We made it there fine. Coming home was a different story! Oh well, let's just say, we got to spend some quality time together and see some country that we have never seen before!
Back to the Ladies Retreat! Those are some of the sweetest ladies and boy, do they ever know how to do a retreat! I just want to thank Mrs. Mila Norris and all the wonderful ladies for the superb job they did!
I felt very honored to be asked to speak for this event. The accommodations were soooo nice! Hannah and I were sure we could just live there in the luxurious suite provided us! It was beautiful! (should have gotten some pics).
The meeting was actually held at the Hampton Inn in Mt. Juliet, TN. A delicious dinner in one of the beautifully decorated meeting rooms began the meeting on Friday evening. Then there was games and snacks and fellowship and more of the same! Saturday morning started with a wonderful continental breakfast, and then two more sessions.
The theme of the was the Fruit of the Spirit. It was a blessing to be able to share with those sweet ladies the truths the Lord had shown me in studying on the Fruit of the Spirit from Galatians 5:22. I praise the Lord for the way He blessed. I pray the ladies all took something home with them that will help them in their walk with the Lord.
It was a special treat to get to see some dear friends. One of them was a friend from all the way in high school, Becky Crabtree. Not too long ago I learned that Becky lives in Murfreesboro. I hadn't really been in much contact with her since high school. I told her about Franklin Rd Baptist Church and she and her husband have been attending there for about a year.
Then I also got to see Angie Barnes, who was in our church here in Nicholasville for a couple years. Her brother, Bro. Mike Norris is the pastor of the church there in Murfreesboro. It is alway so nice to see Angie again.
I had such a good time, as you can see from the above photo! I felt like the ladies from Franklin Road Baptist, as well as Hannah and myself really did what we were supposed to do - retreat! Thanks ladies for such a great time!
Back to the Ladies Retreat! Those are some of the sweetest ladies and boy, do they ever know how to do a retreat! I just want to thank Mrs. Mila Norris and all the wonderful ladies for the superb job they did!
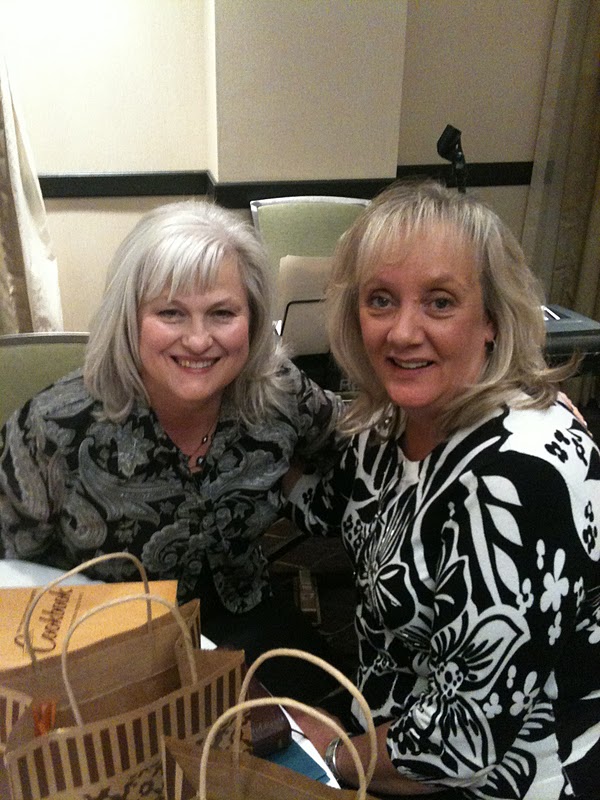 |
| Mrs. Mila and me! |
The meeting was actually held at the Hampton Inn in Mt. Juliet, TN. A delicious dinner in one of the beautifully decorated meeting rooms began the meeting on Friday evening. Then there was games and snacks and fellowship and more of the same! Saturday morning started with a wonderful continental breakfast, and then two more sessions.
 |
| Some of the beautiful Fall decorations |
 |
| The beautiful center pieces were also door prizes. |
It was a special treat to get to see some dear friends. One of them was a friend from all the way in high school, Becky Crabtree. Not too long ago I learned that Becky lives in Murfreesboro. I hadn't really been in much contact with her since high school. I told her about Franklin Rd Baptist Church and she and her husband have been attending there for about a year.
 |
| Becky, my friend from high school - all the way in Murfreesboro! |
 |
Angie and her twin, Amy. Double sweet! |
Wednesday, August 31, 2011
SO SIMPLE, NO SEW CURTAINS!
Need some curtains and need them quickly?
You might want to take a look at what I came up with.
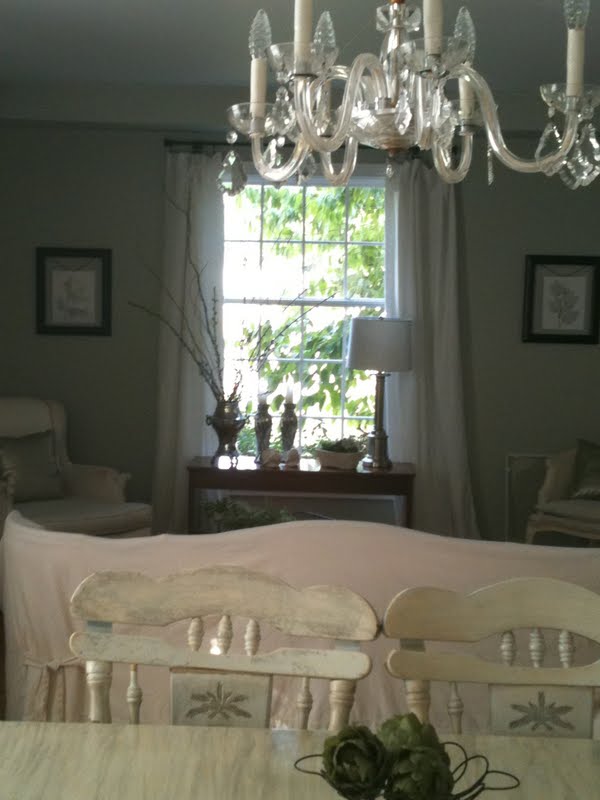
These curtains really show my simple style (once again, it's REALLY simple!) as well as my love of linen.
These curtains are SO SIMPLE! They actually are NO SEW SIMPLE!
 A sewing machine or needle never came near these curtains! Not that I'm against sewing machines or anything (well I have had my moments with them), but it's just that I like quick......really quick.
Here's how I did it. First, look at this before picture of the window without the curtain. The wooden blinds which had been up for 16 years was nothing but and eye sore.
These were nice at one time, I actually love plantation shutters, but something bad happened here. I think maybe water damage in some of the really bad rains we have had may have leaked in. I really don't know. I just know that I had to keep them pulled up at all times so this mess would not show!
So......time for something new! I have been wanting to make some curtains out of linen for this room for some time. I thought I would have to special order linen, but was nicely surprised one day a few months ago when I saw it at Joann's Fabrics. I couldn't believe it. It was exactly what I was wanting .....and the good part is that it was ON SALE! So, I brought some home with me!
 If you decide to do this, make sure you know the length you want your curtains, and they will cut it for you. I had them cut it for 8 ft., length. The above fabric is actually doubled so I just put it in the floor and cut it in half. (You could also have them do this at the fabric store).
This is where the fun part comes in. Simply (love that word), fold the edges of the fabric over along the sides at the top and then fold the top over this. I folded mine over about 2 1/2 to 3 inches. I didn't even pin it or anything I just folded it over and then clipped it to the rod which my husband had hung for me. (I have never had much success at hanging curtain rods, so I don't even try. My husband does much too good of a job!)
I know you're probably wondering what I did for the hem at the bottom. Glad you asked! I simply (there's that word again!) let them "puddle"! I hope that is not way out of style. Is it? I don't really know. I just folded them under and they were long enough to puddle on the floor. If they were not long enough, I suppose you would have to hem them. (You could always use tape!)
This little project even motivated me to actually clean the window inside and out. I am so glad to get that done.
A few more shots.


 Hope you enjoyed hearing about these "So Simple" , quick and easy curtains.
Linking to Beneath My Heart's DIY party.
You might want to take a look at what I came up with.
These curtains really show my simple style (once again, it's REALLY simple!) as well as my love of linen.
These curtains are SO SIMPLE! They actually are NO SEW SIMPLE!

Here's how I did it. First, look at this before picture of the window without the curtain. The wooden blinds which had been up for 16 years was nothing but and eye sore.
 |
| YUCK! |
 |
| NOT SO NICE! |
These were nice at one time, I actually love plantation shutters, but something bad happened here. I think maybe water damage in some of the really bad rains we have had may have leaked in. I really don't know. I just know that I had to keep them pulled up at all times so this mess would not show!
So......time for something new! I have been wanting to make some curtains out of linen for this room for some time. I thought I would have to special order linen, but was nicely surprised one day a few months ago when I saw it at Joann's Fabrics. I couldn't believe it. It was exactly what I was wanting .....and the good part is that it was ON SALE! So, I brought some home with me!

This is where the fun part comes in. Simply (love that word), fold the edges of the fabric over along the sides at the top and then fold the top over this. I folded mine over about 2 1/2 to 3 inches. I didn't even pin it or anything I just folded it over and then clipped it to the rod which my husband had hung for me. (I have never had much success at hanging curtain rods, so I don't even try. My husband does much too good of a job!)
 |
| Fold at top and sides so the raw edges won't show. |
 |
| Curtain hooks.....way to go, in my opinion! |
 |
| So simple! |
I know it would have been nicer to have them sown the right way, and someday, in my "spare time", maybe I will, but for now, with company coming for Labor Day weekend, they work! Honestly, you cannot tell they are not sown or hemmed unless you walk up and closely examine! You're welcome to come to visit, but if you do, please don't examine my "So Simple" curtains!I know you're probably wondering what I did for the hem at the bottom. Glad you asked! I simply (there's that word again!) let them "puddle"! I hope that is not way out of style. Is it? I don't really know. I just folded them under and they were long enough to puddle on the floor. If they were not long enough, I suppose you would have to hem them. (You could always use tape!)
 |
| The puddle! |
This little project even motivated me to actually clean the window inside and out. I am so glad to get that done.
A few more shots.
 |
| At night, pulled together for privacy, of course. |


Linking to Beneath My Heart's DIY party.
Monday, August 29, 2011
A Little Fall Decoration Inspiration
Like most everyone else, I can't believe Fall is almost here. It has been such a great Summer! As I shared in "Some of My Faves About Summer" I love summer! I have really enjoyed it this year; have spent a lot of time with family. It has been such a joy to have grand kids here a lot!
I usually don't rush Fall decorating. As a matter of fact, I don't go overboard with it at all. There are some who have already started decorating for Fall. I like a subtle transition from Summer to Fall. So that's what I
tried to do in this mantle makeover....using flowers that are still in bloom, but those which have a feeling of fall because of their purplish color.

First of all I took a nature walk and gathered up some green hedge apples and cut some purplish flowers off of a Butterfly Bush (I think that's what it's called,) and then I went shopping.....under the kitchen sink for the old metal pitcher to put the silver things in. Then I found me some limes from some deep abyss in the pantry and a dark colored wooden bowl that my husband brought me from Costa Rica a few years ago to put the limes in. I found a mirror upstairs that I put over the mantle as a backdrop "It is really old"! To the right of this little vignette, I put one of my favorite pieces. It is an old handmade fiddle. (One of my son-in-laws let me keep it, and it cracks him up that I use it to decorate with. I love it!)


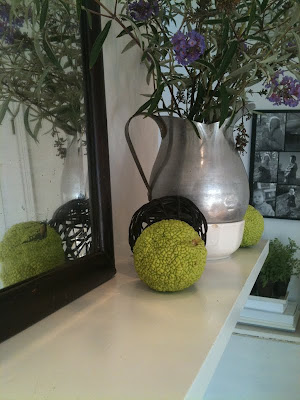

 Well, maybe my old metal container (which belonged to my grandmother, btw), is not quite as elegant as I would like it to be, but it serves the purpose.
OK, guess I'm ready for Fall now!
I usually don't rush Fall decorating. As a matter of fact, I don't go overboard with it at all. There are some who have already started decorating for Fall. I like a subtle transition from Summer to Fall. So that's what I
tried to do in this mantle makeover....using flowers that are still in bloom, but those which have a feeling of fall because of their purplish color.

First of all I took a nature walk and gathered up some green hedge apples and cut some purplish flowers off of a Butterfly Bush (I think that's what it's called,) and then I went shopping.....under the kitchen sink for the old metal pitcher to put the silver things in. Then I found me some limes from some deep abyss in the pantry and a dark colored wooden bowl that my husband brought me from Costa Rica a few years ago to put the limes in. I found a mirror upstairs that I put over the mantle as a backdrop "It is really old"! To the right of this little vignette, I put one of my favorite pieces. It is an old handmade fiddle. (One of my son-in-laws let me keep it, and it cracks him up that I use it to decorate with. I love it!)


 |
| The wall looks blue in this picture. It is not blue. It is actually white. |


OK, guess I'm ready for Fall now!
Tag on Bag
Wrapping gifts and making them look pretty and different is one of my favorite things to do. I really don't like to use the gift bags. I know they are very convenient, quick and easy and pretty, but I just think when you give someone a gift that you have taken the time to wrap, it makes them feel like you really care about them. Maybe that's just the way I feel. I don't know.
Anyway, I usually try to do something really unique and different when I decorate a gift. This past Saturday, I went to a bridal shower, and I succumbed to using a gift bag. It was a beautiful white on white with velvety embossed flowers on it. The bag was pretty enough, but I wanted something extra.
I had actually bought the card with this idea in mind. I took the ribbon handle that was in the bag and tied it to the ribbon on the card on the outside of the bag. The card had an opening in it which said, "A Wedding Wish".


Anyway, I usually try to do something really unique and different when I decorate a gift. This past Saturday, I went to a bridal shower, and I succumbed to using a gift bag. It was a beautiful white on white with velvety embossed flowers on it. The bag was pretty enough, but I wanted something extra.
Here's what I did.
(Hang on..... this is REALLY simple, I promise!)

I know, it's just simple little project, but it kinda changes it up just a little. It works when you are in a hurry. The person you are giving the gift to doesn't have to open the envelope, and it is easy to get to to see who gave the gift.

Just make sure the bag and the card match or compliment each other.
OK, so that's my "Gleaning" for the day. I hope someone can use this idea.
Saturday, August 27, 2011
Blogging via email ......It worked!

--
Gail
Friday, August 26, 2011
Blogging from a Different Angle
I am hoping to be able to send a blog post through email. The main thing I want yo do is learn how to send pictures to my blog. I haven't been able to this since I've had this iPad. Please work! : )
Subscribe to:
Posts (Atom)